Tuesday, May 23, 2023

Housecleaning: Blogging Notes

I've been a little busier these days, so I was not able to blog as much over the last few weeks, but looking to get on a regular cadence again, at least a couple times a week and hopefully more, or some good sessions just posting up on a lot of things. 

As I've blogged before, it is a marathon...

Quick Code: AZ CLI To Get Storage Accounts And Redundancy Type (AKA sku.name)

Here's some quick code to get a list of your Storage accounts from a cloud shell in the Azure Portal.

az storage account list --query "[].{Name:name, Redundancy:sku.name}" --output table

That's it!

It will output something similar to this:

mystorageaccount1    Standard_LRS
mystorageaccount131    Standard_RAGRS

By default this will list everything for the subscriptions you have checked to show resources for in the portal.

Tuesday, April 18, 2023

ChatGPT Files: Thinking More Modular (aka Script Cut-Off)

Sometimes when I've been writing scripts with ChatGPT I've asked it to do a little too much where it either stops sending in code, or the code gets put into code and non-code boxes. At times ChatGPT will stop giving me the code all together, and I'll get into a continuous loop where I keep asking it to finish, it starts over, I ask it again, and then I finally say stop.

So what I've been trying to do instead is ask it to do things differently, where instead of putting all the code in one HTML file, if I'm building a front-end, I'll ask it to put it into different files, like one for HTML and one for Javascript. 

That way it helps it write code a little more modular, and where it doesn't break up or stop generating code. This will still depend on what you are having it write, but altogether, it does help.

At the same time instead of asking it to create whole new scripts, use it to update pieces of scripts, specific functions, or ask it more general questions like how you would do it in theory vs code.


Creating A Pilot Program For ChatGPT And Other AI Tools

 
Like others, I've been working with ChatGPT from a developer and engineering perspective over the past few months, and as developers, we can't shy away from these tools. We have to know and understand them, just like other tools, albeit with the knowledge and understanding that there's a difference in what these new AI tools are offering both from a development standpoint, and a human standpoint.

Lately I've been thinking about how to start a pilot program for developers and engineers for tools like ChatGPT where it's not overly prescriptive, but also has guardrails if being used and paid for like any other software, and how to gather research on that use.

This post outlines some of the pieces to get up and running, and to use as a template for further development of a pilot program specific to your team/department including:

  1. Goal Of The Initiative
  2. Outcomes And Objectives
  3. Pilot Guidelines/Standards
  4. Pilot Project Milestones
  5. Use Case Template


Goal Of The Initiative

To explore the use of ChatGPT and GitHub Copilot/X in the development process and create general guidelines, standards, and feedback on the effective/efficient use and acknowledgment of AI tools.

Research has shown that ChatGPT and GitHub Copilot can help developers write code more efficiently and accurately. For example, ChatGPT can assist with natural language processing tasks, such as summarizing text, answering questions, and generating text. GitHub Copilot, on the other hand, uses machine learning models to suggest code snippets and even whole functions based on the context of the code being written.

However, there are also potential risks and limitations associated with using these tools. For instance, ChatGPT can generate biased or inappropriate text if it is trained on biased or inappropriate data. GitHub Copilot may suggest code that is not optimized or secure, which can lead to software bugs or vulnerabilities.

To address these concerns, it is important for users to understand the capabilities and limitations of the tools. This can include training on how to evaluate the quality of the suggestions provided by the tools, how to review the code generated by the tools, and how to incorporate these tools into the software development process

Outcomes And Objectives

The main objectives and outcomes are the following:

  • Capture general use of the tools during the pilot by developers/engineers/consultants

  • Capture capabilities of ChatGPT and GitHub Copilot specific to organizational domain.
    • Capture and Define use cases where most appropriate with notes.
    • Capture general poll/data on use, effectiveness, etc.

  • Understand metrics around effectiveness.
     

  • Capture and Define limitations and potential risks of use (PHI/Security/Specific Organizational IP)

  • Define some standards/ethics/guidelines around the use of the tools

Pilot Guidelines/Standards

Some specific standards/rules at the outset of the pilot to be adhered to:

  • ChatGPT/AI Tools are still just programs and tools. While tools should help make some tasks and coding easier and to take less time, it is not a solution for everything and the developer/engineer/user, still needs to code, test, understand, and do the work, even if that involves working with AI tools. These are still programs and tools. It is like a camera with AI to help make the image better. You still need the photographer.

  • At the end of the day, the code is yours. While AI tools can help development they are only part of the solution, and like any other tool, is guided by the user. You are responsible for the code, including the understanding of that code (vs just copy/paste).

  • Do not send in any PHI information.

  • Use judgement on any code/data/information being used to create a solution, document, etc.
     
  • Efficiency in code should only be a part of the equation in assigning and taking on more work.

  • The use of AI tools should help us be better developers, programmers, and humans.


Pilot Project Milestones

  • Select the users of the tools for the pilot program

  • Create and define use cases and templates for user input

    • Create an initial set of use cases for ChatGPT/Other OpenAI technologies, and GitHub Copilot. These can be both general and unique to specific technology domains.

    • Create a template for each user to be able to add in their own use case.
       
    • Set schedule/guidelines for when these are updated.

  • Incorporation of the tools into the software development process.
    • This will include setting up paid accounts for each of the developers

  • Initial meeting to walk through different scenarios for use at the beginning of the project

  • One month check-in

  • Two month final check-in

  • Sharing and summary of results internally

  • Standardizing guidelines, rules of use, documentation, and any trained data/models where appropriate

  • Sharing and summary of results to the rest of the IS.

  • Follow up conversations to other tools/phases


Use Case Template

Below is a general list of use cases and a sample table to store information in for each user. Rows could be deleted as needed, and more specific examples could be documented by each user in the pilot program (e.g. "Had bug in code and fixed it").

Use Case Category Was This Used For A Specific Project/Ticket? Did It Save Time? Can you give a percentage (only)
Ask To Create Code You Know Testing


Ask To Create Code You Don't Know Testing


Creating Unit Tests Testing


Code Review Testing


Creating CSS/HTML Frontend Development


Creating Javascript and HTML code together Frontend Development


Creating C# Code Backend Development


Creating Python Code Backend Development


Creating SQL Code Database Development


Creating Excel Function, DAX, Macro Data Analysis


Make Script/Code Run More Efficiently Performance Optimization


Creating Templates For X Code Development Workflow


Explain Code To Me General


Other Information For Consideration 


Sunday, April 16, 2023

Creating A Simple Ethereum Token And Deploying In Remix (Ethereum's Browser Based IDE)

If you wanted to dabble in Solidity and Ethereum tokens, you can create a simple token that you can send to you and your friends, or for anything else. Once a wallet has the tokens, while you can have a smart contract that trades Eth for your token, you can just give them away as well, or if you wanted to, have them go through an off-chain process (like a registration on a web site) and then send them the tokens from the main account (which you could automate as well). 

Here's the contract to create a simple token (and yes, this is using an older version, but it works for this simple token and speaks backwards compatibility).

pragma solidity ^0.4.16;

interface tokenRecipient {
    function receiveApproval(address _from, uint256 _value, address _token, 
 bytes _extraData) public;
    }

contract AnhAnhTokenv1 {
    string public name;
    string public symbol;
    uint8 public decimals = 18;
    uint256 public totalSupply;

    mapping (address => uint256) public balanceOf;
    mapping (address => mapping (address => uint256)) public allowance;

    event Transfer(address indexed from, address indexed to, uint256 value);

    function AnhAnhTokenv1 (
        uint256 initialSupply,
        string tokenName,
        string tokenSymbol
    ) public {
        totalSupply = initialSupply * 10 ** uint256(decimals);
        balanceOf[msg.sender] = totalSupply;
        name = tokenName;
        symbol = tokenSymbol;
    }

    function _transfer(address _from, address _to, uint _value) internal {
        // Prevent transfer to 0x0 address. Use burn() instead
        require(_to != 0x0);
        // Check if the sender has enough
        require(balanceOf[_from] >= _value);
        // Check for overflows
        require(balanceOf[_to] + _value > balanceOf[_to]);
        // Save this for an assertion in the future
        uint previousBalances = balanceOf[_from] + balanceOf[_to];
        // Subtract from the sender
        balanceOf[_from] -= _value;
        // Add the same to the recipient
        balanceOf[_to] += _value;
        Transfer(_from, _to, _value);
        // Asserts are used to use static analysis to find bugs in your code. 
// They should never fail
        assert(balanceOf[_from] + balanceOf[_to] == previousBalances);
    }

    function transfer(address _to, uint256 _value) public {
        _transfer(msg.sender, _to, _value);
    }

}

The program creates a basic ERC-20 token with some additional functions and interfaces. Here are some if the main pieces of code to understand.

1. The interface "tokenRecipient" allows external contracts to interact with the token contract, specifically through a function called "receiveApproval".

2. The beginning variables are used to help set values when you are deploying, and creating the token (in the constructor). You'll see these in Remix when you deploy your contract.

3. "balanceOf" is a key/value pair that maps addresses to their balances, which anyone can check. "allowance" as a data structure works similar but the value is another data structure of addresses and values as it checks token that one address has allowed another address to spend on their behalf.

4. The event "Transfer" is emitted to the blockchain when tokens are transferred.

The contract can go anywhere (you can save as a text file or more specifically a ".sol" file) Ultimately though you will put it into Remix.

Compile And Deploy

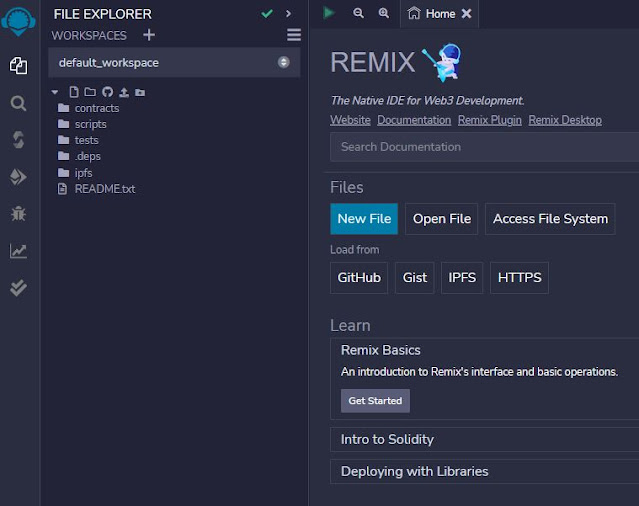
Got to https://remix.ethereum.org. When you first open it you will see the menu on the left and other information in the main window. You want to focus on the left menu and click on the top icon (which is the File Explorer)

Right-click afterwards on "contracts" and select "New File" from the menu.

You will get a box in contracts to create the file name. Name it "MyTokenTest.sol" and then paste in the contract. 

 
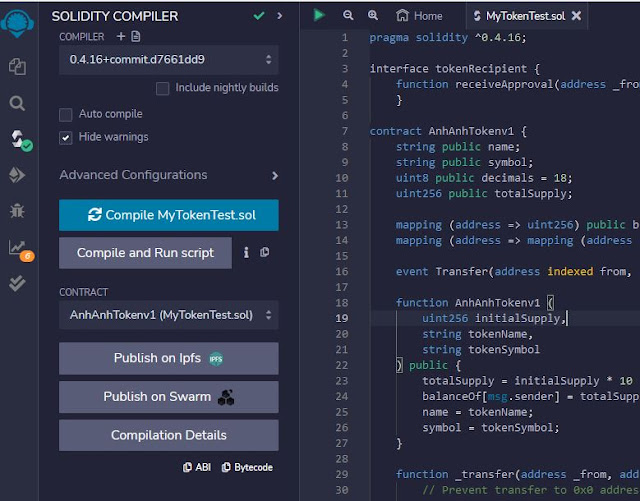
Once you have the file created with the code click on the third menu option which is Solidity compiler. Once you get to that page, make sure you have selected the same compiler version as in the code (sometimes Remix might say it is updating it and it may get close but you can choose the specific version).

After that - you can click on the "Compile MyTokenTest.sol" button and it should compile without any issues which is indicated by the green check mark, versus any errors which you would see under the Compilation Details section. As everything has compiled and is looking good, the only thing left to do is deploy it to a test network! 

To deploy the contract click on the menu item below the compiler:

When you first go to that screen the "ENVIRONMENT" input is set to Remix. 

You want to change that to be MetaMask and then connect to your wallet and select the network (a test network) and an account that has some ether in it.

Next to the orange Deploy button select the down arrow and you will see the parameters to fill in for your token:

Initial supply is the amount you want of your tokens without commas: 1000000.

Token name is the name of the token: Anh Anh Token

And the token symbol is: AANHTI.


Everything else can be left the same and then just press on the transact button and MetaMask will open, confirming the transaction--which is creating a new contract on the Ethereum test blockchain. Remix will then also show the log as well.

After the transaction is complete you will see a line in your wallet like this:


When you click on that entry you can click to view the entry on the "blockchain explorer" (which is Etherscan). 

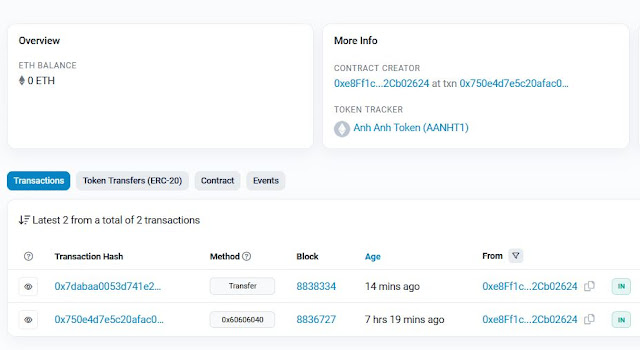
The entry should look similar to the one below:


The From should be the address you were connected to when you deployed it in Remix. When you click on the To link that will take you to the Contract Address for the token you created (tokens can only be created via smart contracts). That page will show you information about the deployment/transaction as well as to drill into your token.

It's not the most advanced contract, but it's an ERC-20 token and everything works like it should. You can check out the actual token for this post here: https://goerli.etherscan.io/address/0xf3ab79837d63c4105f15b4d777c407d176c1760b

Saturday, April 15, 2023

Quick Bytes: Generate A QR Code

Some quick code to generate a QR code image with HTML and Javascript

<!DOCTYPE html>
<html>
<head>
    <meta charset="utf-8">
    <title>QR Code Generator</title>
    <script src="https://cdnjs.cloudflare.com/ajax/libs/qrious/4.0.2/qrious.min.js"></script>
</head>
<body>
    <form>
        <label for="qr-text">Enter text to generate QR code:</label>
        <input type="text" id="qr-text" name="qr-text">
        <button type="button" onclick="generateQRCode()">Generate QR Code</button>
    </form>
    <canvas id="qr-code"></canvas>
    <script>
        function generateQRCode() {
            var text = document.getElementById("qr-text").value;
            var qr = new QRious({
                element: document.getElementById("qr-code"),
                value: text,
                size: 300 // Change the size to 300 pixels
            });
        }
    </script>
</body>
</html>

A SharePoint JSON Example For Adding In A Record To A List

 
I've been involved in more projects with SharePoint where different stakeholders want to use SharePoint for a front-end but want to get data from different data sources, typically from JSON data, so it makes it easy to help transform that data.

One of the easier ways to add data to a SharePoint List is via JSON with the key/values with a few rules to follow:

  1. If a column name is not found, the post will error out.
  2. The column name has to be the actual column name in the List.
  3. For simple types (see the example of Title and FirstName) it's just a key/value pairing.
  4. For complex types you have to include the __metadata information for each column and the type.

See the example below. 

{
  "__metadata": {
    "type""SP.Data.NewsReservationList_x0020_Request_x0020_NewEntry"
  },

  "Title""New 4:30 Reservation",
  "FirstName""Ginny",
  "LastName""Joe",

  "Time": {
    "__metadata": {
      "type""Collection(Edm.String)"
    },
    "results": [
      "4:30 pm - 6 pm"
    ]
  },

  "HearAboutUs": {
    "__metadata": {
      "type""Collection(Edm.String)"
    },
    "results": [
      "Advertisement",
      "Family"     ]
  }
}

What can be tricky at first is seeing a SharePoint List with one value, even though it can handle more, and thinking it's not a complex type, when it really is.

An Open Letter To SharePoint On App Registrations

Dear SharePoint,

First, I just wanted to say it’s not like I don’t like you — I like you and I like some of the easy integration you have with Azure and Azure AD Enterprise apps — nice easy way to secure it all and give us that connection (because in so many ways that’s what we’re using it for — a connection to a SharePoint List to do some CRUD’ing)

For sure.

But I do have a complaint.

It’s a small one, but I think important.

There’s just not a great way to see all the applications and what specific list and permissions they have access to, and there doesn’t seem to be a great way to see it the other way around (at least that I’m aware of).

I mean, you tell us to do it that way — and it works great — but once you start having a lot of apps connecting into SharePoint, it would be nice to see X name app with the SharePoint Lists it has access too and what permissions it has. And yes, I know — nomenclature helps — but I just feel like there should be a better way to do this.

Now I know you have a lot going on and maybe I’ve missed something for quite some time, and that’s okay, but to that point, if there is, it’s not easily accessible or made aware of from a general developer/engineer perspective.

Okay. Hope this finds you well (or at least not horribly under the weather,
Adam

Quick Bytes: YAML File To Build Your Package To Your Azure DevOps Custom Feed

 
Here's a quick YAML file to build and publish a class library package to a custom feed. Just replace out the "MyProject" and "MyFeed" with the appropriate names. After the build and publish you can then consume that feed to get that package and the associated libraries. To get your feed information just click on the "Connect To Feed" button on the main Feed page (after you select it from the drop down from the Artifacts page) and then select the system you are using to get the connection information.

# ASP.NET Core
# Build and test ASP.NET Core projects targeting .NET Core.
# Add steps that run tests, create a NuGet package, deploy, and more:
# https://docs.microsoft.com/azure/devops/pipelines/languages/dotnet-core

# the build will trigger on any changes to the master branch
trigger:
master

# the build will run on a Microsoft hosted agent, using the lastest Windows VM Image
pool:
  vmImage'windows-latest'

# these variables are available throughout the build file
# just the build configuration is defined, in this case we are building Release packages
variables:
  buildConfiguration'Release'

#The build has 3 seperate tasks run under 1 step
steps:

# The first task is the dotnet command build, pointing to our csproj file
taskDotNetCoreCLI@2
  displayName'dotnet build'
  inputs:
    command'build'
    arguments'--configuration $(buildConfiguration)'
    projects'MyProject/MyProject.csproj'

# The second task is dotnet pack command again pointing to the csproj file
# The nobuild means the project will not be compiled before running pack, because its 
# already built in above step
taskDotNetCoreCLI@2
  displayName"dotnet pack"
  inputs:
    command'pack'
    arguments'--configuration $(buildConfiguration)'
    packagesToPack'MyProject/MyProject.csproj'
    nobuildtrue
    versioningScheme'off'

# The last task is a nuget command, nuget push
# This will push any .nupkg files to the 'TestFeed' artifact feed
# allowPackageConflicts allows us to build the same version and not throw an 
# error when trying to push
# instead it just ingores the latest package unless the version changes
taskNuGetCommand@2
  displayName'nuget push'
  inputs:
    command'push'
    feedsToUse'select'
    packagesToPush'$(Build.ArtifactStagingDirectory)/**/*.nupkg;
!$(Build.ArtifactStagingDirectory)/**/*.symbols.nupkg'
    nuGetFeedType'internal'
    publishVstsFeed'MyFeedName'
    versioningScheme'off'
    allowPackageConflictstrue

Solidity Developer Survey Results: Favorite Programming Language

Favorite Programming Language

Saw this interesting slide on the Solidity Blog.

https://blog.soliditylang.org/2023/03/10/solidity-developer-survey-2022-results/

Azure App Service Deployment Center (aka Set It And Forget it CI/CD)

At the end of the day I just want to make CI/CD easy. It's just something that I believe should come out of the box in some ways. 

To me, Deployment Center is the closest thing to that.

Hook it up to a repository.

Select a branch.

Done.

  • If the project won't build/has errors (by default) it won't allow the deployment.
  • It logs each build/deploy in Deployment Center.
  • Do the same for PRD and other environments.
  • If a project doesn't work/has errors that can't be fixed, edited, go the traditional pipeline route.

It doesn't give you the most flexibility and I do have some questions on different projects, the choice of which it chooses by default, but when it works--it just works. If you don't have so many apps that it's hard to manage that way (individually), and you're in there anyway with configuration keys, etc. this is enticing.

And if you have varying degrees of developer levels on your team this is a great way to get everyone involved in the process but that's not too involved either. No build scripts. No releases, stages, environments, etc. Those may be needed/wanted, but if you just want to deploy after check-in, Deployment Center takes care of that for you.

While I understand it defeats the purpose to give it a lot of options, it does leave a lot up to this unseen entity doing our bidding, and I hope in the future maybe it gives a few more options to customize though.

Otherwise--sometimes it's okay to set it and forget it.

Friday, April 14, 2023

Don't Forget That "Withdraw" Function In Your Ethereum Contract

I've had this happen a couple times with some contracts I was creating early on where I did not have any way to retrieve funds. So if I was doing a simple contract to exchange tokens for Eth, all of that portion was working fine, but after doing some test transactions I realized I couldn't get the Eth out. 

Yup.

Nothing worse than seeing Eth build up and not being able to touch it, even if in test.

Yup.

Just make sure you don't forget this function

function withdraw() public onlyOwner {
  address payable receiver = payable(ownerDraw);
  receiver.transfer(address(this).balance);
}

And then import in the zepplin library in your sol file.

import "@openzeppelin/contracts/access/Ownable.sol";

Making A Javascript Slot Machine

Creating a Javascript slot machine is both a fun project and a nice way to separate out the pieces of what can sometimes seem like a complicated program (and it can be when talking about much larger systems, progressive jackpots, etc.) but at the base is actually not too difficult.

Here's the code in it its entirety:

 <!DOCTYPE html>
    <html>
    <head>
        <style>
            .slot-container {
                display: flex;
                flex-direction: column;
                align-items: center;
            }

            .slot-row {
                display: flex;
                margin-bottom: 40px;
            }

            .slot {
                width: 150px;
                height: 150px;
                border: 1px solid black;
                margin-right: 20px;
                margin-bottom: 20px;
                position: relative;
            }

            .winning-slot {
                border: 12px solid red;
            }

            button {
                font-size: 24px;
                padding: 10px 20px;
                background-color: blue;
                color: white;
                border: none;
                border-radius: 5px;
                margin: 0 auto;
                display: block;
                margin-top: 20px;
            }
        </style>
    </head>
    <body onload="updateSlots()">
        <div class="slot-container">
            <div class="slot-row">
                <div id="slot1" class="slot"></div>
                <div id="slot2" class="slot"></div>
                <div id="slot3" class="slot"></div>
            </div>
            <div class="slot-row">
                <div id="slot4" class="slot"></div>
                <div id="slot5" class="slot"></div>
                <div id="slot6" class="slot"></div>
            </div>
            <div class="slot-row">
                <div id="slot7" class="slot"></div>
                <div id="slot8" class="slot"></div>
                <div id="slot9" class="slot"></div>
            </div>
        </div>
        <button onclick="updateSlots()">Spin</button>

        <script>
            // Define an array of images
            var images = [
                'https://via.placeholder.com/150x150/000000/FFFFFF/?text=1',
                'https://via.placeholder.com/150x150/000000/FFFFFF/?text=2',
                'https://via.placeholder.com/150x150/000000/FFFFFF/?text=3',
                'https://via.placeholder.com/150x150/000000/FFFFFF/?text=4',
                'https://via.placeholder.com/150x150/000000/FFFFFF/?text=5'
            ];

            // Function to generate a random image
            function getRandomImage() {
                return images[Math.floor(Math.random() * images.length)];
            }

            // Function to update the images in the slots
            function updateSlots() {
                var slot1 = document.getElementById('slot1');
                var slot2 = document.getElementById('slot2');
                var slot3 = document.getElementById('slot3');
                var slot4 = document.getElementById('slot4');
                var slot5 = document.getElementById('slot5');
                var slot6 = document.getElementById('slot6');
                var slot7 = document.getElementById('slot7');
                var slot8 = document.getElementById('slot8');
                var slot9 = document.getElementById('slot9');

                slot1.innerHTML = '<img src="' + getRandomImage() + '"/>';
                slot2.innerHTML = '<img src="' + getRandomImage() + '"/>';
                slot3.innerHTML = '<img src="' + getRandomImage() + '"/>';
                slot4.innerHTML = '<img src="' + getRandomImage() + '"/>';
                slot5.innerHTML = '<img src="' + getRandomImage() + '"/>';
                slot6.innerHTML = '<img src="' + getRandomImage() + '"/>';
                slot7.innerHTML = '<img src="' + getRandomImage() + '"/>';
                slot8.innerHTML = '<img src="' + getRandomImage() + '"/>';
                slot9.innerHTML = '<img src="' + getRandomImage() + '"/>';

                // Remove the "winning-slot" class from all slots
                slot1.classList.remove("winning-slot");
                slot2.classList.remove("winning-slot");
                slot3.classList.remove("winning-slot");
                slot4.classList.remove("winning-slot");
                slot5.classList.remove("winning-slot");
                slot6.classList.remove("winning-slot");
                slot7.classList.remove("winning-slot");
                slot8.classList.remove("winning-slot");
                slot9.classList.remove("winning-slot");

                // Check if the player has won
                if (slot1.innerHTML === slot2.innerHTML && slot2.innerHTML === slot3.innerHTML) {
                    slot1.classList.add("winning-slot");
                    slot2.classList.add("winning-slot");
                    slot3.classList.add("winning-slot");
                }
                if (slot4.innerHTML === slot5.innerHTML && slot5.innerHTML === slot6.innerHTML) {
                    slot4.classList.add("winning-slot");
                    slot5.classList.add("winning-slot");
                    slot6.classList.add("winning-slot");
                }
                if (slot7.innerHTML === slot8.innerHTML && slot8.innerHTML === slot9.innerHTML) {
                    slot7.classList.add("winning-slot");
                    slot8.classList.add("winning-slot");
                    slot9.classList.add("winning-slot");
                }
                if (slot1.innerHTML === slot4.innerHTML && slot4.innerHTML === slot7.innerHTML) {
                    slot1.classList.add("winning-slot");
                    slot4.classList.add("winning-slot");
                    slot7.classList.add("winning-slot");
                }
                if (slot2.innerHTML === slot5.innerHTML && slot5.innerHTML === slot8.innerHTML) {
                    slot2.classList.add("winning-slot");
                    slot5.classList.add("winning-slot");
                    slot8.classList.add("winning-slot");
                }
                if (slot3.innerHTML === slot6.innerHTML && slot6.innerHTML === slot9.innerHTML) {
                    slot3.classList.add("winning-slot");
                    slot6.classList.add("winning-slot");
                    slot9.classList.add("winning-slot");
                }
                if (slot1.innerHTML === slot5.innerHTML && slot5.innerHTML === slot9.innerHTML) {
                    slot1.classList.add("winning-slot");
                    slot5.classList.add("winning-slot");
                    slot9.classList.add("winning-slot");

                }
                if (slot3.innerHTML === slot5.innerHTML && slot5.innerHTML === slot7.innerHTML) {
                    slot3.classList.add("winning-slot");
                    slot5.classList.add("winning-slot");
                    slot7.classList.add("winning-slot");
                }
            }
        </script>
    </body>
    </html>

The main "box" of the slot machine--the playable area--is just standard HTML--where the innerHTML is created automatically from a set of images, with each square randomly assigned an image, and then checked to see if the innerHTML is the same when the Spin button is pressed.

In order to win across, down, and diagonal, each square needs to check for the winning combination for each set of squares. So in the example above in order to win diagonally with slot1 (or square 1) you have to check squares number 5 and 9. 

While the code certainly could be updated to be more modular, using this example it's pretty easy to see how everything works and displays back to the user from a UI perspective (adding and removing styles) and can be built onto for a more customized slot machine experience.

Quick Bytes: Javascript Live Password Hashing

I was recently working on a UI and wanted to hash a password while it was being typed. Here’s the quick code:

You need this in your HTML file to load the library

<script src=”https://cdnjs.cloudflare.com/ajax/libs/crypto-js/4.0.0/crypto-js.min.js"></script>

This javascript code

function hashPassword() {
const password = document.getElementById(‘password’).value;
const hashedPassword = CryptoJS.SHA256(password).toString();
console.log(‘Hashed password:’, hashedPassword);
document.getElementById(‘hashedPassword’).value = hashedPassword;
}

And then here’s the form code

<label for=”password”>Password Phrase:</label>
<input type=”text” id=”password” oninput=”hashPassword()”>
<input type=”text” id=”hashedPassword” name=”hashedPassword”>

Happy Coding!